Factory-direct · USD 9,800 / set EXW 20-day production lead time 304 stainless steel construction ISO 9001 · TÜV · CE documentation

Installation & anchoring

Three ways to fix it to the ground. Pick before you order.

The complete ensemble can be anchored with cast-in embedded anchors in a new concrete footing, with expansion anchor bolts into an existing cured slab, or on a relocatable angle plate bolted to a hard surface. We supply the matching hardware for whichever method you choose — tell us at quotation stage.
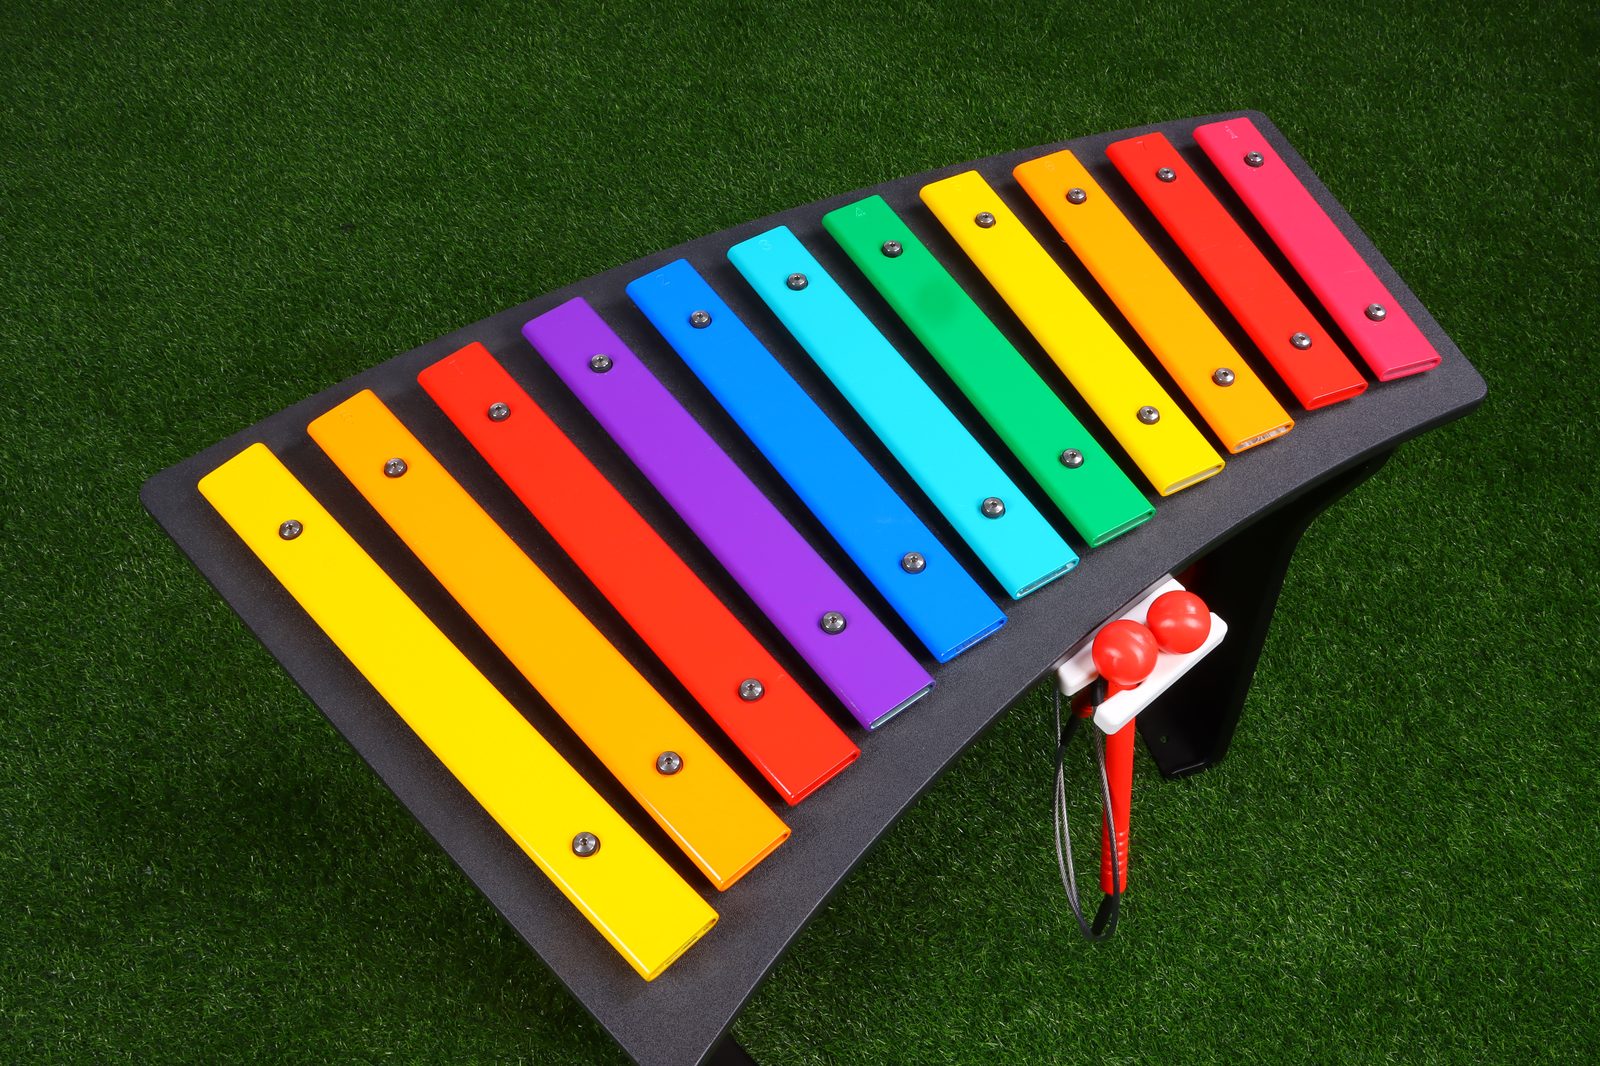
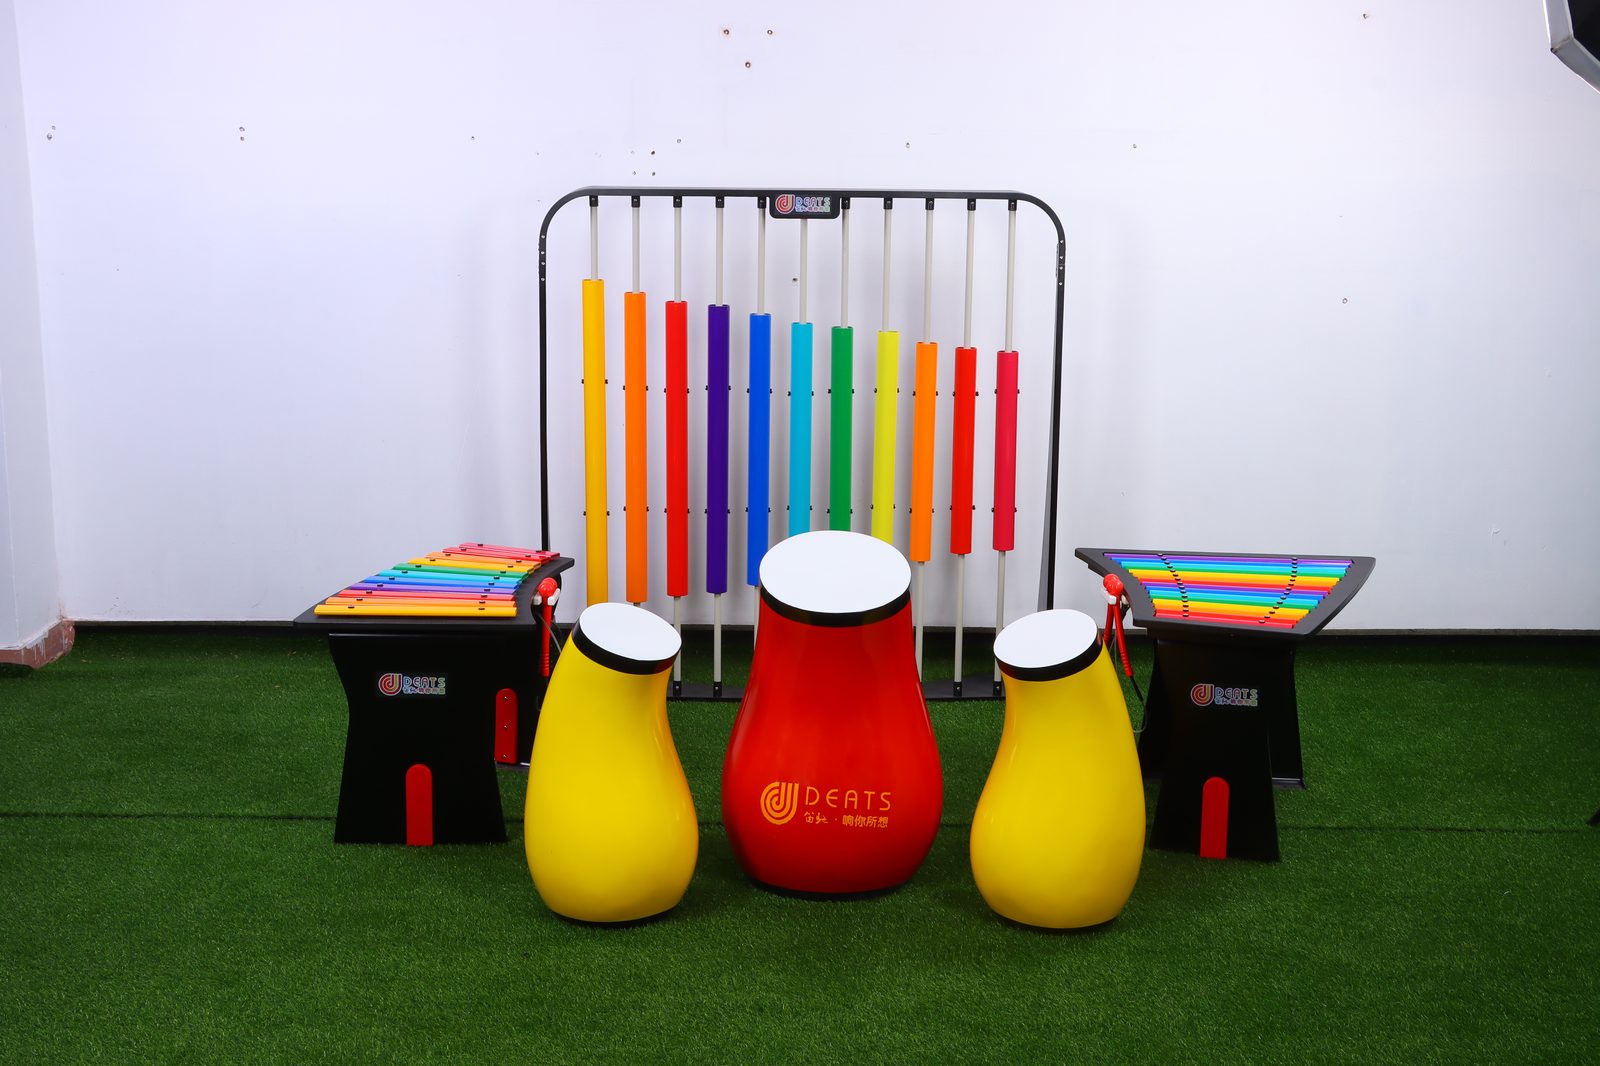
Rainbow marimba with colour-coded bars
Rainbow marimba
Complete DEATS outdoor percussion ensemble as supplied
The complete ensemble

Three anchoring methods

All three methods are standard for this set. The diagrams are schematic — footing size, embedment depth, edge distances and bolt grade must be confirmed by your project's engineer of record for local soil, frost and loading conditions.

new concrete footing J-bolt cage set before the pour

A. Cast-in embedded anchors — new concrete

A J-bolt cage is positioned in the formwork and cast into a fresh concrete footing. Once the concrete has cured, the instrument base plate is set over the projecting threads and fastened down.

  • For new footings, soft ground and unpaved sites.
  • Highest resistance to pull-out and overturning.
  • Needs the anchor template before the pour, and a cure period before mounting.
  • Recommended where the site is being built or resurfaced.
existing cured concrete slab

B. Expansion anchor bolts — existing concrete slab

Holes are drilled into an existing cured concrete slab and the base plate is fixed with mechanical expansion anchors (wedge / through bolts). Tightening expands the sleeve against the bore to lock the bolt in place.

  • For existing plazas, hardstanding and retrofit projects.
  • No wet concrete and no cure time — install the same day.
  • Requires a sound slab of adequate thickness and edge distance.
  • Bolt grade and embedment to be confirmed by the engineer of record.
paved surface / hardstanding angle plate, bolted down, removable

C. Relocatable on angle plates

The instrument is fixed to a steel angle plate that is bolted to an existing hard surface, so it can be moved or repositioned later without casting concrete.

  • For temporary installs, events and rented sites.
  • No footing, no cure time.
  • Confirm the plate and fixings with us for your surface.
Common to all three methods: 304 stainless steel posts, base plates and exposed fixings; tamper-resistant fasteners with no exposed threads at hand height; mallets supplied on tethers. Surfacing, accessible routes and any critical fall height are determined by the surrounding play equipment and the authority having jurisdiction, not by the instrument.

Before the set arrives

  • Confirm the anchoring method in writing so the correct hardware ships with the set.
  • Have the footing or slab design approved by your engineer of record. We provide anchor layout details and product data; we do not stamp structural drawings.
  • Check the delivery point. The set arrives in two plywood crates, 260 kg gross. Confirm there is hard standing and a way to move the crates to the installation position.
  • Plan the layout. Position tuned instruments so several people can play at once, with a firm, stable route to each playing position.

On installation day

  • Unpack and check against the crate packing list and the dispatch photographs.
  • Set base plates, level, tighten anchors to the specified torque, fit tamper-resistant caps.
  • Attach mallet tethers and check every note against the tuning reference.
  • Retain the care & maintenance schedule and the spare parts list for the facilities team.

Specification references

US specifications for public play spaces commonly cite the following. They are listed here as design references your authority may apply, not as product certifications we claim to hold.

ASTM F1487Standard consumer safety performance specification for playground equipment for public use.
ASTM F1292Impact attenuation of surfacing within the use zone of play equipment.
ASTM F1951Accessibility of surface systems under and around play equipment.
2010 ADA StandardsAccessible routes and ground-level play components, where applicable.

Our instruments have no assigned critical fall height of their own. Where they sit inside the use zone of play equipment, the surrounding surfacing and route are governed by that equipment's design. We supply project-specific documentation on request; we do not claim a completed third-party ASTM assessment or IPEMA certification.

Maintenance

Wash down with mild detergent, inspect fixings and mallet tethers periodically, and replace wear parts as needed. The care & maintenance schedule ships with the set. 10-year structural, 5-year finish and 2-year wear-parts warranty applies from date of acceptance.

Per-instrument drawings

Installation drawings for each instrument.

Each instrument in the set ships with its own installation drawing. The drawings below show the assembly and the two ground methods — expansion bolts for hard ground, or embedded anchors for soft ground. Reference labels are shown in the original language; the steps and parts list here are the English translation.

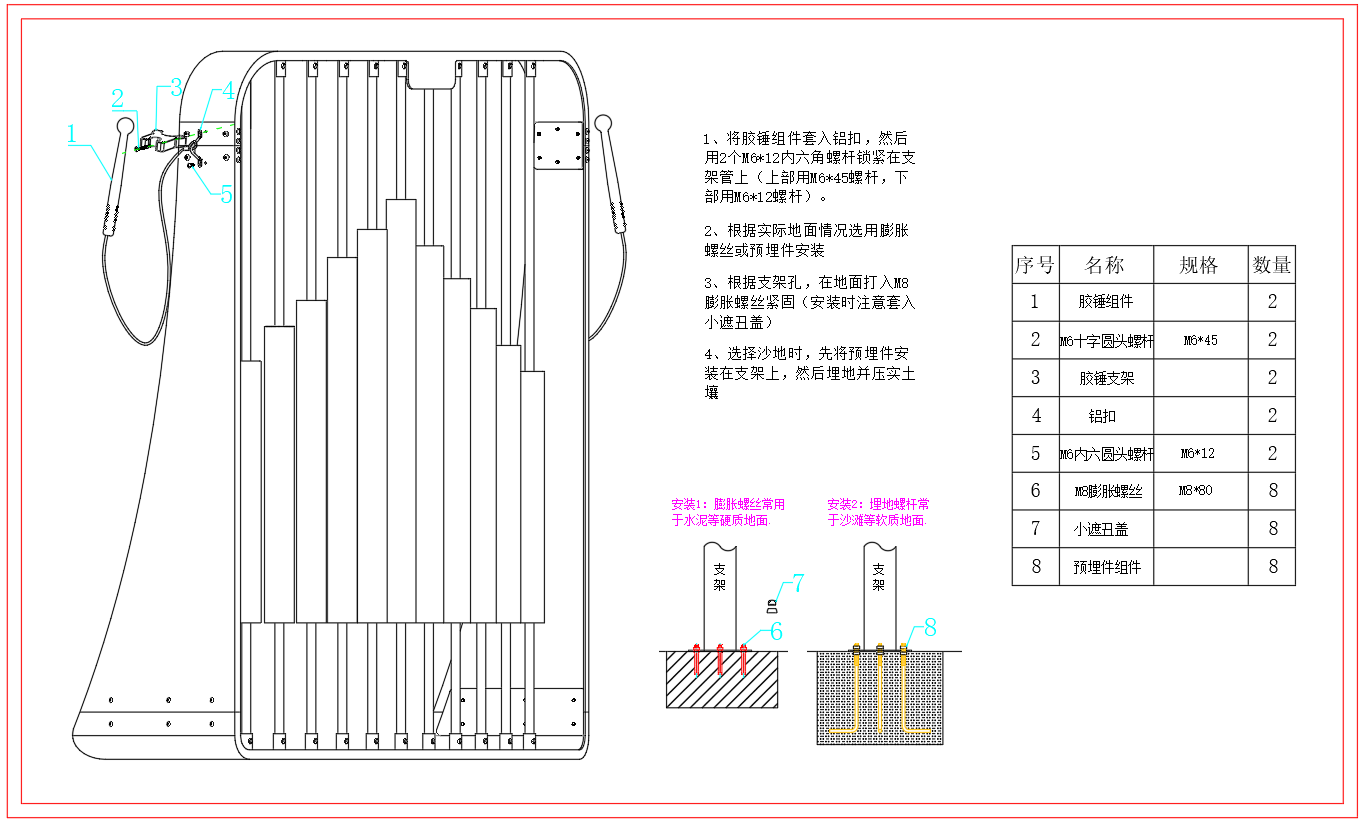
Chime panel (large)

The large chime panel: mallet assemblies on a stainless frame, with two ground methods.

Manufacturer installation drawing for the large chime panel
Manufacturer’s installation drawing — reference labels shown in the original language

Installation steps

  1. Slide the mallet assemblies into the aluminium clamps, then secure them to the support tube with two M6x12 hex-socket bolts (the upper bolt is M6x45, the lower is M6x12).
  2. Choose expansion bolts or embedded anchors according to the actual ground.
  3. For hard ground, drill and drive M8x80 expansion bolts through the bracket holes and tighten; fit the small cover caps.
  4. For soft or sandy ground, first fit the embedded anchor assemblies to the brackets, then bury and compact the soil.

Parts list

#PartSpecQty
1Mallet assemblyM6x12 / M6x452
2M6 pan-head boltM6x452
3Mallet bracket-2
4Aluminium clamp-2
5M6 hex-socket boltM6x122
6M8 expansion boltM8x808
7Cover cap-8
8Embedded anchor assembly-8

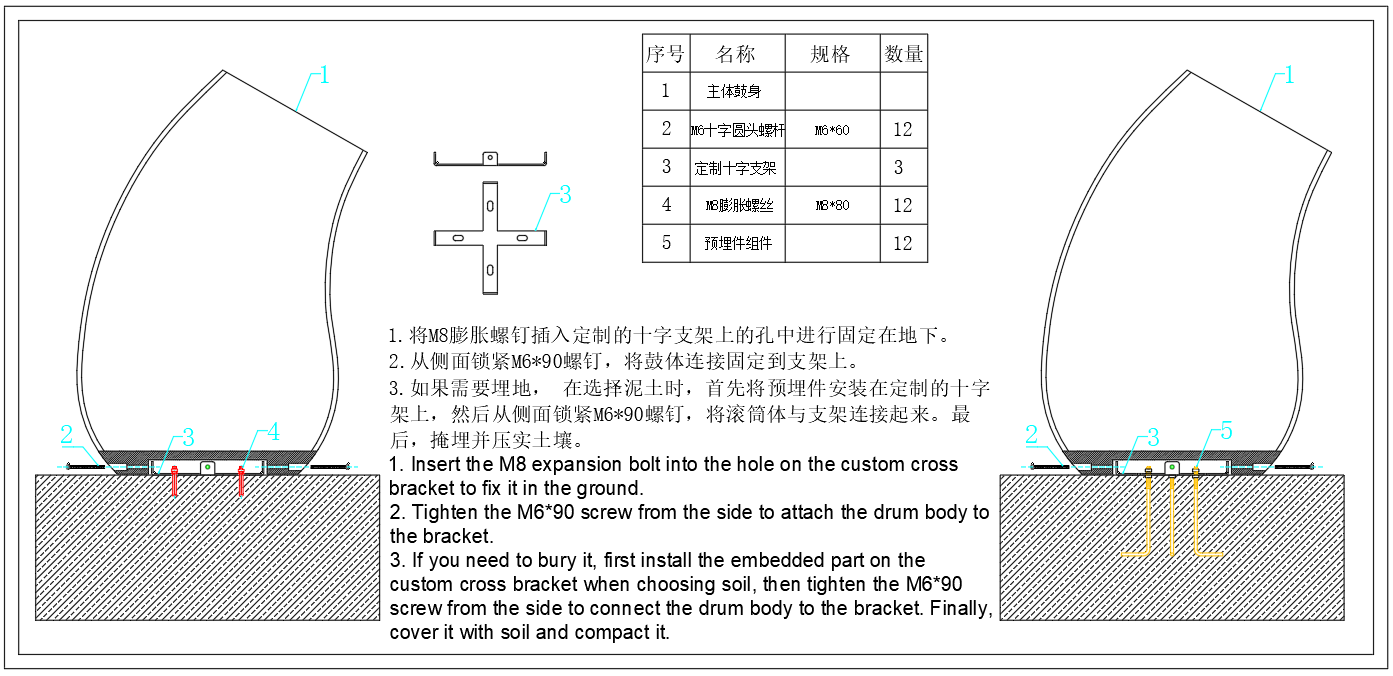
Drum

The drum body on a custom cross base, with two ground methods.

Manufacturer installation drawing for the outdoor drum
Manufacturer’s installation drawing — reference labels shown in the original language

Installation steps

  1. Insert the M8 expansion bolts through the holes of the custom cross base and secure the base to the ground.
  2. From the side, tighten the M6 bolts to connect and fix the drum body to the base.
  3. If burying: for soil, first fit the embedded anchor assemblies onto the cross base, then connect the drum body with the side M6 bolts, and finally backfill and compact the soil.

Parts list

#PartSpecQty
1Drum body-1
2M6 pan-head boltM6x6012
3Custom cross base-1
4M8 expansion boltM8x8012
5Embedded anchor assembly-12

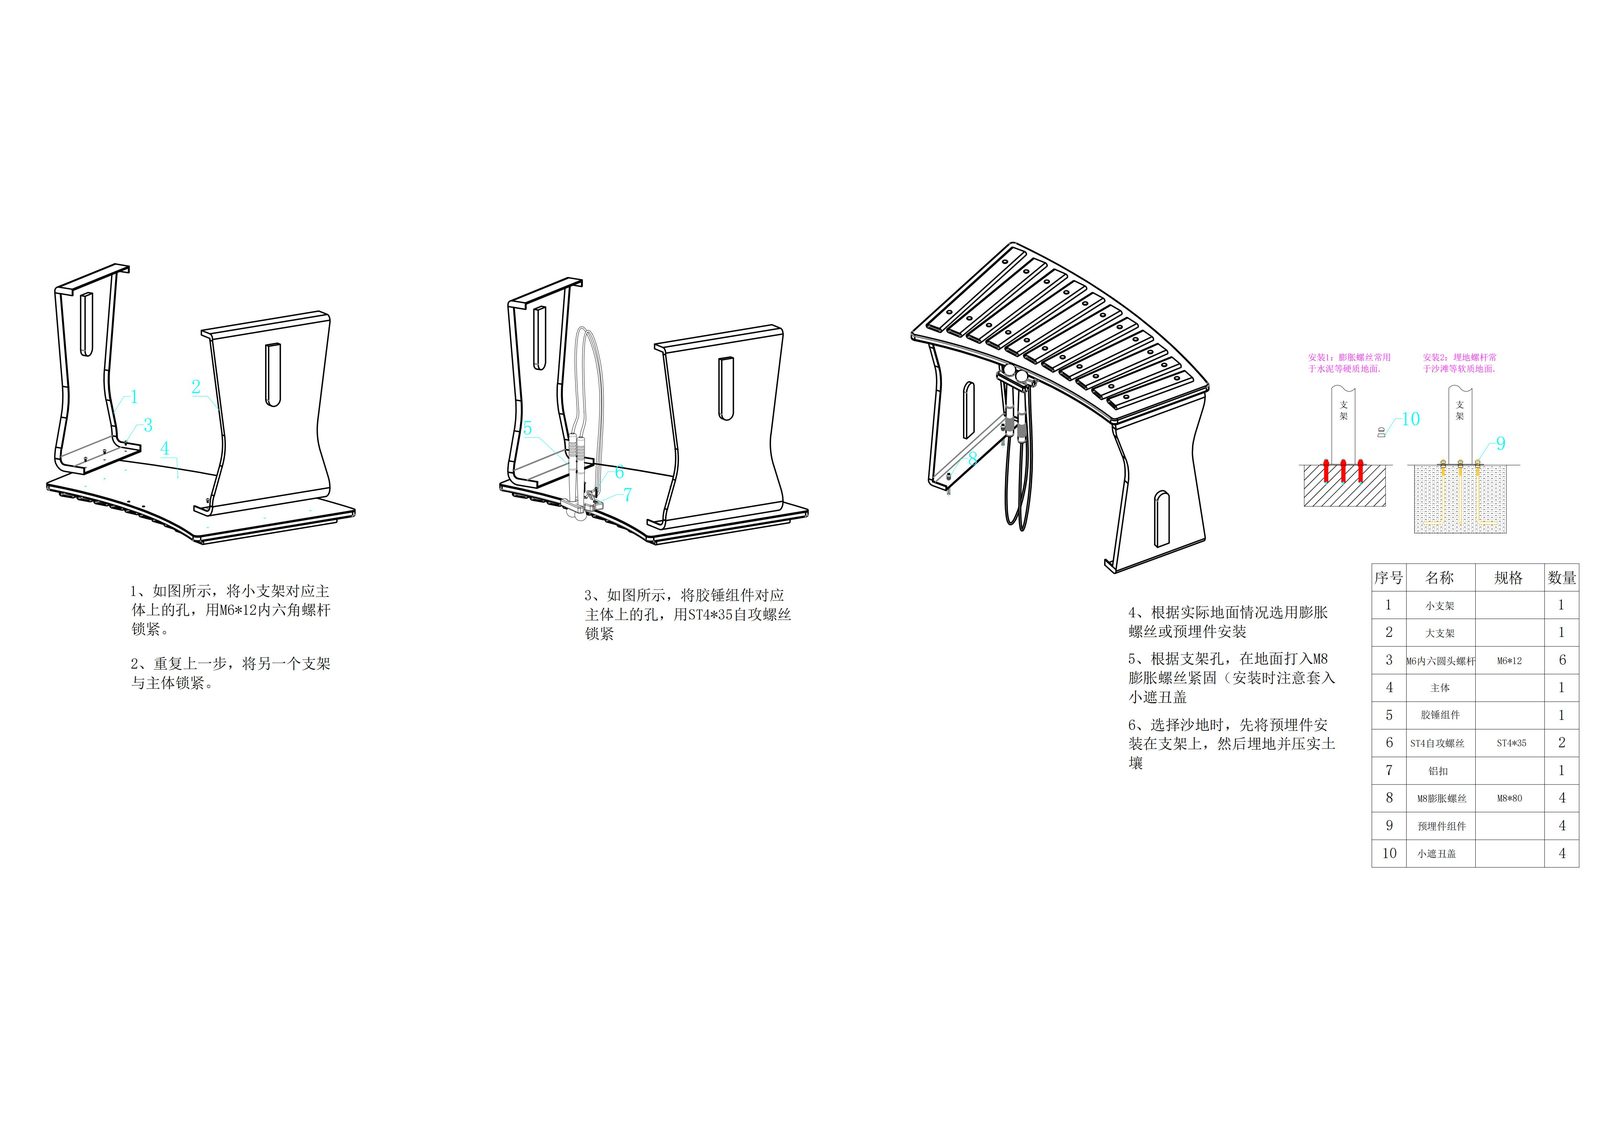
Marimba

The marimba: brackets, mallet assembly and tube, with two ground methods.

Manufacturer installation drawing for the marimba
Manufacturer’s installation drawing — reference labels shown in the original language

Installation steps

  1. Align the small bracket with the holes on the main body and secure with M6x12 hex-socket bolts.
  2. Repeat to secure the other (large) bracket to the body.
  3. Align the mallet assembly with the body holes and secure with ST4x35 self-tapping screws.
  4. Choose expansion bolts or embedded anchors per ground condition.
  5. For hard ground, drive M8x80 expansion bolts through the bracket holes and fit the cover caps.
  6. For sandy ground, first fit embedded anchors to the brackets, then bury and compact soil.

Parts list

#PartSpecQty
1Small bracket-1
2Large bracket-1
3M6 hex-socket boltM6x126
4Main body-1
5Mallet assembly-1
6Self-tapping screwST4x352
7Aluminium clamp-2
8M8 expansion boltM8x804
9Embedded anchor assembly-4
10Cover cap-4

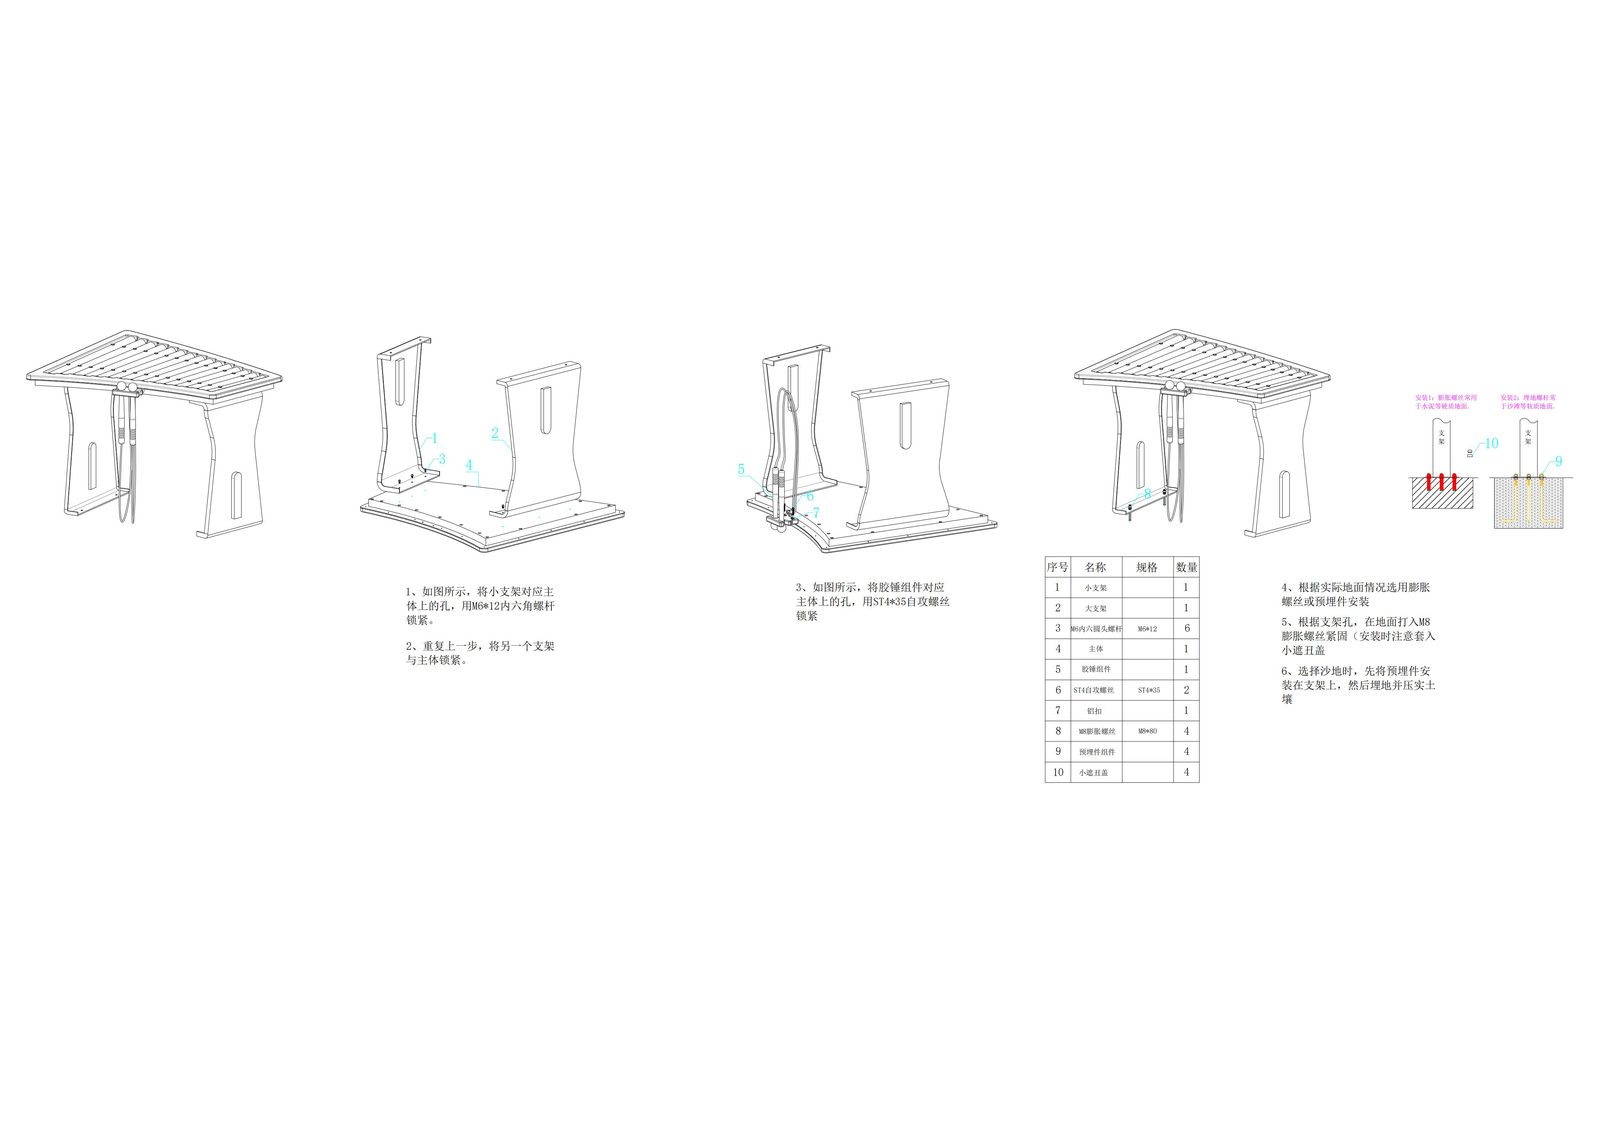
Chime panel (small)

The small chime panel: brackets and gong-plate assembly, with two ground methods.

Manufacturer installation drawing for the small chime panel
Manufacturer’s installation drawing — reference labels shown in the original language

Installation steps

  1. Align the small bracket with the body holes and secure with M8x12 hex-socket countersunk bolts.
  2. Repeat to secure the other bracket to the body.
  3. Align the gong-plate assembly with the body holes and secure with ST4x16 self-tapping screws.
  4. Choose expansion bolts or embedded anchors per ground.
  5. For hard ground, drive M8x80 expansion bolts through the bracket holes and fit the cover caps.
  6. For sandy ground, first fit embedded anchors, then bury and compact soil.

Parts list

#PartSpecQty
1Small bracket-1
2Large bracket-1
3M8 hex-socket countersunk boltM8x122
4Flat washer-2
5Gong-plate assembly-1
6Self-tapping screwST4x162
7Corner washer-1
8M8 expansion boltM8x804
9Embedded anchor assembly-4
10Cover cap-4

Tell us your site conditions and we will confirm the right anchor.

Send us your site address, delivery port and any specification text. We will return a written quotation, a packing list and the document copies you need.